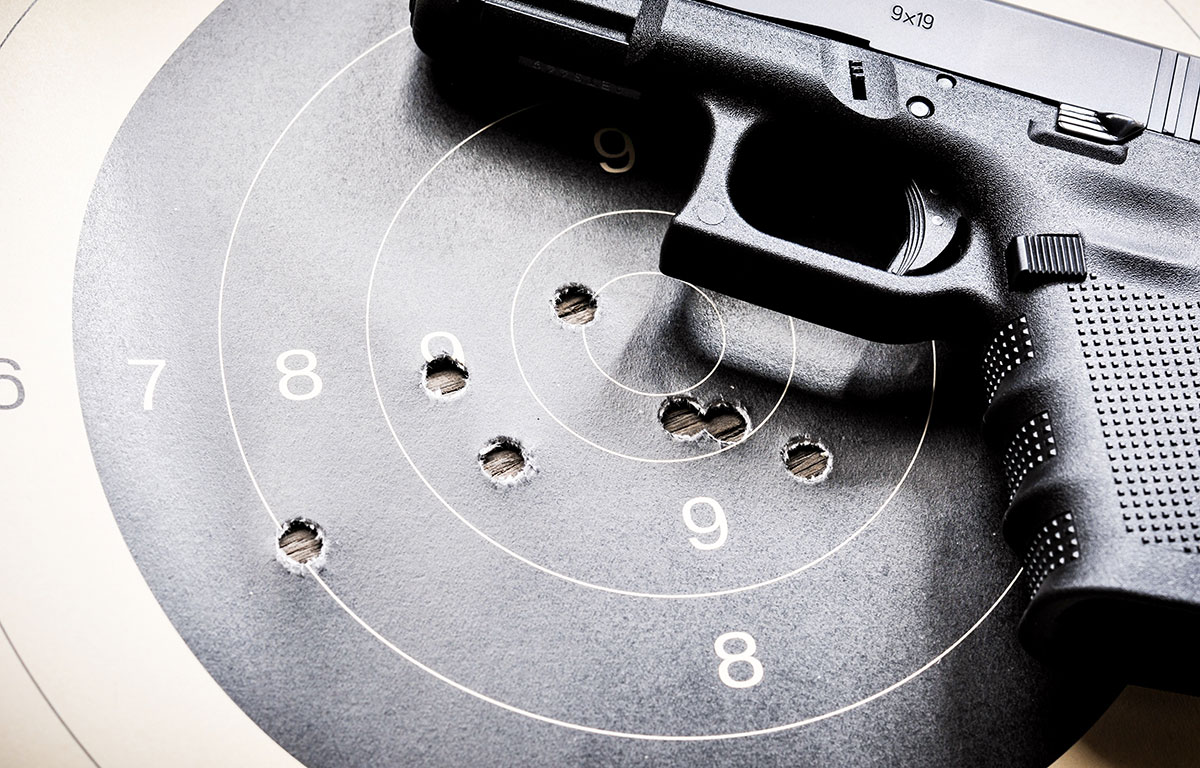
Improve Your Accuracy with These 7 Pistol Shooting Tips
For anyone who is committed to mastering firearms, the struggle to sharpen their accuracy seems to be a never-ending challenge. Of all the firearms in our arsenal though, the handgun can be the most challenging to master. It is small with a short sight radius and generally has a trigger that requires more pressure than the gun weighs. With so much to wade through, it is time to look at eight simple things anyone can do to improve their overall accuracy with a handgun.
Trigger Control
First thing to focus on is trigger control. We often hear this phrase used when discussions of accuracy arise. Few times however is it given sufficient attention. The truth is that pistols for the most part are accurate. It’s our manipulation of the weapon that interferes with its ultimate capability. Here are some solid trigger control drills to help you improve.
Dime on the Front Sight Drill
Always easier with the help of a partner, unload your weapon and remove the magazine if possible. Reset the action on your pistol and have your partner balance a dime on the front sight. Now, execute a smooth, clean press of the trigger. If you do this correctly, the front sight will not dip or move and the dime will stay in place. If the dime falls off, you are generally jerking the trigger and causing movement in the gun. That movement translates into missed shots. The key to keeping the dime steady is a smooth continuous trigger press with a clean “break” at the end.
Keep the Slack Out
The more we move the trigger, the higher the probability that we will miss our shot. The trigger press is composed of three stages: the slop, which is the distance the trigger travels freely to the rear before you encounter resistance; the slack, or the distance the trigger will still travel while under tension prior to firing; and the shot, which is where the trigger finishes its’ travel and ultimately fires the weapon. In our initial press of the trigger we will experience all three stages of the trigger motion. However after the initial press, the trigger will reset. The distance required for reset generally takes it only as far as the “slack” point. Do not allow the trigger to travel any further forward than is necessary. A great drill for this is to empty your weapon and press the trigger. With your support side hand, rack the slide and as it is moving forward relax your trigger finger. The tension of the trigger will push forward and allow it to reset. Only let the trigger move as far forward as it has to. Having a partner actually rack the slide for you while you stay pointed in is also very helpful. Continuous dry practice with this drill will familiarize you with how far your trigger needs to travel. At all costs we look to avoid letting the trigger move all the way forward and even worse, our finger comes off the trigger. This generally ends up in a “slap” of the trigger on subsequent shots and will interfere with accuracy.
Follow Through
Follow through is the act of keeping the gun steady to send follow up shots on target. The challenge faced comes in the way of anticipation or flinch. Especially true with newer shooters, anticipation of the next shot can cause a flinch response to the weapon firing. This causes muzzle dip and is never a help to accuracy. To deal with this challenge try this proven drill.
Ball and Dummy
One of the most classic pistol drills, the ball and dummy drill is designed to help eliminate flinch. The drill is generally done with a partner to assist. While the shooter is turned away, the partner will place their weapon in a state of readiness. It will either be set with a round in the chamber, or reset without a round. Either way, the trigger will function. The shooter is turned back around and given the weapon. They point in and press as if they were shooting a bull’s eye. If the weapon is unloaded, the trigger will “click” yet the muzzle should not dip. If there is a noticeable dip, it is a sign of anticipating the shot. Continue this drill with an occasional live round placed in the chamber so as to keep the shooter off balance. Approximately 75% of the time it should be empty however. This is a solid drill for learning to overcome the anticipation of the shot firing.
Sight Picture and Alignment
The last part of our accuracy formula looks at sight picture and alignment. There are many theories and methods of shooting when it comes to the world of sites. At the most fundamental and reliable level though we look to align the sights on target while intently focusing on the front sight. The rear sights should be slightly blurry as will be the target. The front sight should be crystal clear. A few reliable drills to build confidence are these:
Bench Shooting
One of the best ways to learn certain components of shooting is to minimize the need to focus on other parts. By shooting from a benched position you are able to eliminate the need to stabilize yourself in order to make good shots. This is a confidence builder as well as a drill to help you build good sight alignment habits. Sit at a bench with your arms resting on a shooting bag. Acquire a solid sight picture and alignment. Take your time and fire shots with the intent of managing perfect sights throughout the process.
Figure 8 Drill
One of the challenges we face is the feeling that our sights are all over the place as we begin to make a shot. For the most part that is just our perception and not reality. With good mechanics you can make good accurate shots consistently. A drill to show you this, as well as to work on trigger control is the figure 8 drill. At about six yards point in at your target, now take all of the slop and slack out of the trigger. Intentionally move the front sight six to eight inches in a figure 8 over the bull’s eye. Now, as you come across the bull’s eye, break your shot and reset your trigger to shoot again. Continue this for five or six shots. What you will find is that you are much more accurate than you may think. By managing the trigger well, it allows for quite a bit of motion and you still maintain good accuracy.
The goal is always to bring these components together. Unless you are a static bull’s eye shooter, there will be many moving parts to making a shot. A few drills designed to start mixing components without overwhelming yourself are these:
Bring Them All Together
Ragged Hole Drill
The ragged hole drill is another classic. From six yards, you will slow fire five rounds into a single point on your target. Do your best to focus on a small portion of the target. Better yet, get a target that has one to two-inch dots on it as focus points. Take your time and use the exact same point of aim each time. Do not chase your shots or try to make corrections. If you manage your trigger and sights well, you should end up with a single ragged hole. If your shots are spread out, it is a sign that you need to polish up on one or more of the basics.
Shrinking Targets
Similar to the ragged hole drill, the goal is to start shrinking your shot groups. Find or make a target that has three or four circles on it each a little smaller than the previous one. From six yards, fire five rounds into each circle. The goal is to have all the rounds inside the circle. As you master one circle, move to the next smaller and so on. This is as much a confidence builder as it is a skill builder.
Shooting a handgun can be a challenge. As with all shooting it always comes back to the fundamentals. By practicing these drills you can improve individual portions and ultimately bring them all together. In the end, like all complex motor skills, shooting is a perishable skill. Practice must be ongoing but with practice comes skill!


![From Range to Carry: The All-New SIG SAUER P226-X LEGION Family Takes Aim [Video]](https://content.gunbroker.com/wp-content/uploads/2025/09/SIG-SAUER-P226X-LEGION-FULL-2-1200-x-800-400x267.jpg)

![Beretta M9A4 Overlanding Pistols: Features, Specs, and What’s New for 2026 [Video]](https://content.gunbroker.com/wp-content/uploads/2026/01/BERETTA_M9A4_OVERLANDING_CLAY-1200x800-1-400x267.jpg)
![SHOT Show 2026: Beretta Range Day [Video]](https://content.gunbroker.com/wp-content/uploads/2026/01/Beretta-Range-Day-Featured-400x267.jpg)